Unconventional Out-of-Band Management using MikroTik LtAP mini-LTE kit and OpenVPN server
Welcome to the dynamic cosmos of networking and connectivity, where the quest for resilient yet budget-friendly solutions takes centre stage. Today, we’re not merely delving into the technical aspects; we’re embarking on a journey into the avant-garde of connectivity solutions – the fusion of the sleek MikroTik LtAP mini-LTE Kit and the powerful OpenVPN.
In this post, brace yourself to unveil the covert potential hidden within the MikroTik LtAP mini-LTE Kit. We’re not merely scratching the surface of its features; we’re unleashing its power and flexibility to provide solutions beyond its initial design. Get ready for a journey where the possibilities of this kit extend far beyond the expected.
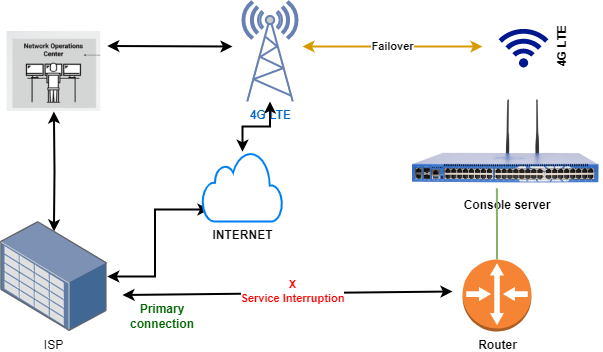
What is Out-of-Band (OOB) Management? Now, picture this scenario: You’re overseeing a network device situated miles away from your headquarters. Through the wonders of remote protocols like SSH, you’ve been managing it seamlessly. Suddenly, the device throws a fit, and you are cut off. Oh no! Cue the need for a physical sprint to the device, employing console access to assess the damage – time wasted, money drained, and downtime soaring.
But hold on! What if I told you there’s a smoother way to confirm the device’s status without breaking a sweat? Yes, you guessed it right – Out-of-Band Management! It’s not just a term; it’s the networking world’s century-defining invention, saving you from the hassle of always needing physical access during failures a thing of the past.
While In-Band Management operates through the LAN using conventional remote access methods like SSH, web or Telnet, Out-of-Band Management offers a secure alternative to administering connected devices and IT assets without relying on the corporate LAN – through a separate connection.
Why consider Out-of-Band (OOB) Management? The principal advantage lies in its accessibility during network downtimes, when devices are powered off, in sleep or hibernation modes, or are otherwise unreachable. OOBM serves as a remote solution for rebooting crashed devices and managing powered-down equipment. The core objective is to ensure continuous 24/7 network uptime by maintaining constant access to critical IT assets such as routers, switches, firewalls, servers, power systems, storage devices, and telecom appliances that constitute the backbone of an organization’s communication infrastructure.
Is Out-of-Band (OOB) Management a software or hardware solution? While software may play a role in the management interface, the core functionality of Out-of-Band Management (OOBM) is rooted in specialized hardware for remote control and management. This is facilitated through the use of serial console servers, sometimes referred to as terminal servers, offering an alternative remediation path for critical network devices. The establishment of this separate management plane typically occurs through a 3G or 4G LTE cellular connection. However, in some deployments, fiber/copper ports are utilized through alternative WAN providers for added flexibility and redundancy. Implementing Out-of-Band management is simple, it’s done by placing console servers at each location and connecting them to routers, switches, and other key hardware.
The Console Server provides administrators with access to multiple USB, RS232, or Ethernet console management ports, offering remote connectivity from any location, at any time, and on any platform, replicating a direct local connection. It can facilitate remote reconfiguration, rebooting, and reimaging over the internet or wide-area networks (WANs). Through increased visibility into the physical environment and real-time equipment status, the Console Server effectively reduces disruption and downtime. This, in turn, guarantees heightened business continuity by improving overall uptime and operational efficiencies.
Several established console server solutions for Out-of-Band Management (OOBM) are available, such as Opengear, Perle, and others. While effective, these solutions often incur significant costs, encompassing hardware acquisition and software licenses. To overcome this, we have chosen an unconventional yet affordable alternative, ensuring a seamless OOBM operation.
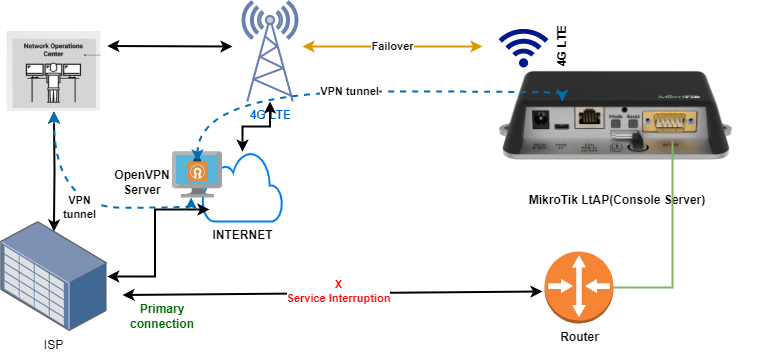
This solution employs the MikroTik LtAP as a console server, integrating a 4G LTE cellular connection alongside an OpenVPN server instance. The OpenVPN server runs on an Ubuntu 20.04.6 LTS server hosted in a secure and dependable cloud environment. For detailed instructions on setting up the VPN, you can refer to the comprehensive guide provided in a well-documented post on WebHi.com.
The MikroTik LtAP, thanks to its impressive routerOS, goes beyond the standard serial console use. Its serial port boasts advanced functionalities, one of which involves providing access to another connected device, such as a switch or router, through a serial cable. A comprehensive step-by-step guide for configuring this capability is intricately outlined in a MikroTik wiki post.
By utilizing this feature, the console port of an external device is linked to the serial port of the MikroTik LtAP. This innovative setup establishes Command Line Interface (CLI) access to the connected device directly from the RouterOS, effectively transforming the LtAP into a versatile console server. It’s a game-changer in expanding the LtAP’s capabilities!
How do we then establish a connection from the office to the remote Console Server (MikroTik LtAP) which has a cellular internet connection to get console access to our remote router or a switch? Our WAN connection relies on a cellular 4G LTE setup. However, accessing the console server from the internet proves challenging due to the cellular connection often being assigned a private IP behind a NAT device. Even if a public IP is in play, firewall barriers typically block incoming traffic. This is where OpenVPN tunnelling steps in, providing a crucial solution to navigate through these connectivity challenges. The connection is facilitated by establishing a VPN tunnel between the console server and the OpenVPN instance running in the cloud.
Here are the steps to follow to accomplish the VPN tunnel setup.
1. After successfully installing the OpenVPN server [follow the guide provided in this post], open the /etc/openvpn/server.conf file and make the following changes.
Add the following lines:

proto tcp
plugin /usr/lib/x86_64-linux-gnu/openvpn/plugins/openvpn-plugin-auth-pam.so login
cipher AES-256-CBC
ncp-ciphers AES-256-CBC
tls-cipher TLS-ECDHE-ECDSA-WITH-AES-128-GCM-SHA256
Uncomment the following lines:
#push "redirect-gateway def1 bypass-dhcp"
#tls-crypt tls-crypt.key
#auth SHA2562. On the OpenVPN server, create a user account for the user to be used in the MikroTik LtAP.
user@oob-vpn-server:~$sudo adduser [username]

Enter password for the user and continue to create the user
3. Run the OpenVPN script provided after installation, and choose “Add a new user”, when prompted for “client name” use the same username that was used when creating a Linux-based user in step 2.
user@oob-vpn-server:~$sudo ./openvpn-install.sh
4. If all goes well, a client file will be generated and stored in /home/[username] directory as [username].ovpn, Transfer the file and save it on your PC.
5. On the MikroTik LtAP, assuming you’re using Webfig.
6. Gather your ca cert file and your pem file (containing your client cert and key) from the OpenVPN server. I’ll refer to them as oob-server-ca.crt and oob-client-1.pem but they can be named anything.
7. Connect to the device using Webfig and go to Files, upload both the ca.crt and client.pem files.
8. Go to System/Certificates and import both files. After they’re imported, you should see ‘T’ as the status for ca.crt and ‘KT’ as the status for the client cert/key. You might want to rename them here since the default names will be cert_1 and cert_2.
9. Now go to PPP/Profiles and create a new profile named openvpn-client. Set as follows;
Use IPv6: no
Use MPLS: no
Use Compression: no
Use VJ Compression: no
Use Encryption: yes

All other fields can be left empty or at their defaults.
10. Now go to PPP/Interface and add a new OVPN Client. Set as follows.
Connect to: <OpenVPN server IP ddress>
Port: 1194 <or whatever port your server uses>
Mode: ip
User: <username from the OpenVPN Server>
Password: <Password for the username>
Profile: openvpn-client
Certificate: <your client cert>
Auth: <sha1>
Cipher: <aes 256 or aes 256-cbc>

The server MUST be set to 'proto tcp' and must not need tls-auth. Neither udp nor tls are supported.
Once the connection to the server is established, accessing our device from the OpenVPN server is possible through the console server via the established VPN tunnel. There are two ways to access the device;
- Utilize SSH to connect to the VM running the OpenVPN server, and subsequently SSH into the console gateway. This method is straightforward but lacks flexibility.
- Create a user account on the OpenVPN server, download the OpenVPN client on your PC, load the necessary certificate files, and establish a session between your PC and the OpenVPN server. This places your PC on the same tunnel network as the console servers, providing flexibility in accessing them via SSH, Webfig, or Winbox.
And that concludes the setup – an easy and cost-effective Out-of-Band Management solution. However, there are some limitations to this approach. The MikroTik LtAP console server allows only one device connection. In a single-device location, this is not an issue. For two devices, integrating two MikroTik LtAP devices is a viable solution. In environments with numerous devices, invest in a console server (with more console ports) that supports the OpenVPN client and integrate it with our solution.
There are several potential enhancements to consider. Building a graphical user interface (GUI) for simplified management and monitoring could be implemented. Additionally, various aspects of the design could be refined for further improvement.
Hey there! If you found this post enjoyable, a fantastic way to support my work is by sharing this post and leaving a comment in the reply section. The greater the number of readers I attract, the more motivated I become to create even more posts for you.
References