Resizing disk size for a Ganeti instance
This process entails two stages:
a) Adding Disk space to a Ganeti instance
Stop the machine using the command below:
root@master-node:~# gnt-instance stop cloud.renu.ac.ug
NB: cloud.renu.ac.ug is the name of the Ganeti instance to be re-sized
There after, run the command below.
Warning: Since this command usually takes long to complete, it’s strongly advised that you run it when working directly on the console of the machine, or in screen mode in case you’re working remotely.
root@master-node:~# gnt-instance grow-disk cloud.renu.ac.ug 0 50g
This command will grow the disk 0 (first disk) of the ganeti instance called cloud.renu.ac.ug by 50GB, meaning the disk size will be increased by 50GB from its initial, that is to say, from 200GB to 250GB.
Please be patient till it ends, sample waiting period below
root@master-node:~# gnt-instance grow-disk cloud.renu.ac.ug 0 50g
11:18:14 2020 Growing disk 0 of instance ‘cloud.renu.ac.ug’ by 50.0G to 250.0G
11:18:17 2020 – INFO: Waiting for instance cloud.renu.ac.ug to sync disks
11:33:28 2020 – INFO: – device disk/0: 61.40% done, 9m 1s remaining (estimated)
11:34:29 2020 – INFO: – device disk/0: 65.90% done, 7m 26s remaining (estimated)
11:35:30 2020 – INFO: – device disk/0: 70.50% done, 6m 26s remaining (estimated)
11:36:30 2020 – INFO: – device disk/0: 74.50% done, 6m 10s remaining (estimated)
11:37:31 2020 – INFO: – device disk/0: 78.80% done, 4m 30s remaining (estimated)
11:38:32 2020 – INFO: – device disk/0: 83.30% done, 3m 42s remaining (estimated)
11:39:32 2020 – INFO: – device disk/0: 87.90% done, 2m 31s remaining (estimated)
11:40:33 2020 – INFO: – device disk/0: 92.40% done, 1m 38s remaining (estimated)
11:41:34 2020 – INFO: – device disk/0: 96.20% done, 53s remaining (estimated)
11:42:28 2020 – INFO: – device disk/0: 99.90% done, 2s remaining (estimated)
11:42:30 2020 – INFO: Instance cloud.renu.ac.ug’s disks are in sync
Next, start the vm and confirm that the space has been added. You can use the “lsblk” command to check the new disk size.
root@master-node:~# gnt-instance start cloud.renu.ac.ug
b) Making added space part of the file system
After the above process is completed successfully, we log into the machine (cloud.renu.ac.ug in this case) and proceed with making the extra space part of the file system.
NB: we shall be using LVM in combination with fdisk to achieve this, therefore, the disk partitions must be supporting LVM for this to happen.
To check if the current file system is LVM compatible, the following commands should all return some information, as illustrated below:
root@machine:~# pvs
root@machine:~# vgs
root@machine:~# lvs

From the results above, there is no free space available in Physical Volume (pvs)and Volume group (vgs). This implies that there’s no free space to use in re-sizing the disk partitions, unless we avail some to the system.
NB: Physical Volume is the storage available for use by LVM.
Therefore, to extend the size of the partitions, we need to add a new physical volume (PV) that will be made from the extra space we added to the disk in part (a). Once the PV is created successfully, we can then extend the volume group (VG) by adding the PV created to it. This will create enough free space to extend the Logical volume size.
NB: A volume group is a collection of physical volumes.
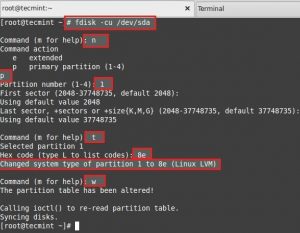
To create the physical volume, we shall use fdisk as detailed below:
root@machine:~# fdisk -cu /dev/sda
- To Create new partition Press n.
- Choose primary partition use p (or just press ENTER to use the default).
- Choose which number of partition to be selected to create the primary partition (or just press ENTER to use the default).
- Press 1 if any other disk available (or just press ENTER to use the default).
- Change the type using t.
- Type 8e to change the partition type to “Linux LVM”.
- Use p to print the create partition ( here we have not used the option).
- Press w to write the changes.
Once the above procedures have completed successfully, you can restart the machine for the changes to take effect, or you can simply run “partprobe” for the changes to effect without restarting the machine.
root@machine:~# partprobe
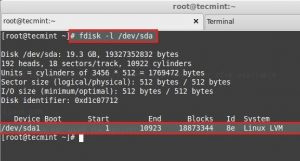
List and check the partition we have created using fdisk.
Next, create new PV (Physical Volume) using following command.
root@machine:~# pvcreate /dev/sda1
Verify that the physical volume has been created successfully using the command below:
root@machine:~# pvs
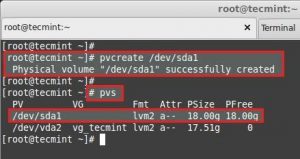
The “pvs” command above now shows that we have free space available, therefore, we can proceed with adjusting the volume group (VG).
NB: We can only increase the size of any disk space by using the free space available in the volume group (VG), not the free space for the physical volume (PV). Thus, the space in the PV must be added to the VG.
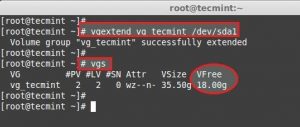
Extending the volume group (VG)
Add this PV to “vg_tecmint” volume group to extend the size of a volume group to get more space for expanding the logical volume. Note that “vg_tecmint” is the name of my volume group in this scenario, therefore, you should replace “vg_tecmint ” with the name of your VG returned by the pvs command.
root@machine:~# vgextend vg_tecmint /dev/sda1
Let us check the size of a Volume Group now using:
root@machine:~# vgs
We can even see which physical volumes (PVs) are used to create a particular volume group with the pvscan command.
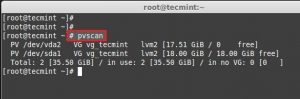
From the results of the pvscan command, we can see the the PV we added and it’s totally free. Let us see the size of each logical volume, using lvdisplay command, we have currently before expanding any of them.
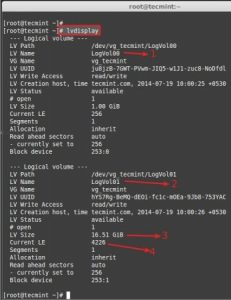
- LogVol00 defined for Swap.
- LogVol01 defined for /.
- Now we have 16.50 GB size for / (root).
- Currently there are 4226 Physical Extend (PE) available.
Resize the partition
With “vgs” command you can see how much free space is available. By issuing “lvresize” command, you can either use exact amount to extend or percentage. In my example I use 100%, but it could’ve been 441.63G.
Only use 100% of the FREE space if you don’t need space for restoring the HOME partition., otherwise, a lower percentage is recommended.
NB: It is important to include the minus (-) or plus (+) signs while resizing a logical volume. Otherwise, you’re setting a fixed size for the LV instead of resizing it.
[root@machine /]# lvresize -l +100%FREE centos/root
Size of logical volume centos/root changed from 50.00 GiB (12800 extents) to 491.63 GiB (125858 extents).
Logical volume root successfully resized.
[root@machine /]#
/* Confirm the size of your partitions */
[root@machine /]# lsblk
NAME MAJ:MIN RM SIZE RO TYPE MOUNTPOINT
fd0 2:0 1 4K 0 disk
sda 8:0 0 500G 0 disk
├─sda1 8:1 0 500M 0 part /boot
└─sda2 8:2 0 499.5G 0 part
├─centos-root 253:0 0 491.6G 0 lvm /
└─centos-swap 253:1 0 7.9G 0 lvm [SWAP]
sr0 11:0 1 1024M 0 rom
Check the type of the file system on your root partition by running:
[root@machine /]# df -T
We are almost done but we still have to resize the actual filesystem, otherwise your operating system can still only recognize the old size. I’ll use resize2fs for this:
For an ext4 filesystem, run:
[root@machine /]# resize2fs /dev/centos/root
For an xfs filesystem, you can run:
[root@machine /]# xfs_growfs /
Other important LVM commands:
lvscan :- lists logical volumes currently present in the system
Reference:
http://docs.ganeti.org/ganeti/current/man/gnt-instance.html#grow-disk
https://www.tecmint.com/extend-and-reduce-lvms-in-linux/
https://www.linuxhelp.com/how-to-manage-and-create-lvm-on-centos-7