Q-in-Q Tunneling for ELS support on Juniper Switches
In a network where Service Providers run customers’ VLAN traffic over their backbone network, there is a possibility of VLAN crushing if different customers use overlapping VLAN IDs. With Q-in-Q Tunneling Providers can segregate different customers’ VLAN traffic on a link (for example, if the customers use overlapping VLAN IDs) or bundle different customer VLANs into a single service VLAN.
With Q-in-Q tunneling, providers can segregate or bundle customer traffic into fewer VLANs or different VLANs by adding another layer of 802.1Q tags. Q-in-Q tunneling is useful when customers have overlapping VLAN IDs because the customer’s 802.1Q (dot1Q) VLAN tags are prepended by the service VLAN (S-VLAN) tag.
This makes it a suitable solution for service providers since it gives them freedom on which S-VLANs to use without changing customers’ C-VLANs and customers can use any VLANs they want.
How Q-in-Q Tunneling Works
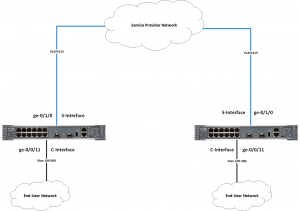
In Q-in-Q tunneling, as a packet travels from a customer VLAN (C-VLAN) to a service provider’s VLAN (S-VLAN), a customer-specific 802.1Q tag (Customer’s S-VLAN tag) is added to the packet. This additional tag is used to segregate traffic into service-provider-defined service VLANs (S-VLANs). The original customer 802.1Q tag (C-VLAN(s) tag(s)) of the packet remains and is transmitted transparently, passing through the service provider’s network. As the packet leaves the S-VLAN in the downstream direction, the extra 802.1Q tag (Customer’s S-VLAN tag) is removed.
This solution has been illustrated on a Juniper EX-2300-C Switch with Enhanced Layer 2 Software (ELS) support.
There are multiple ways Q-in-Q tunneling maps C-VLAN(s) to S-VLAN(s).
- All-in-one bundling
- Many-to-one bundling
- Many-to-many bundling
- Mapping a specific interface
In this tutorial, only “All-in-one bundling” will be covered.
All-in-one bundling maps packets from all C-VLAN interfaces on a customer CPE to an S-VLAN.
First, configure all-in-one-bundling on a C-VLAN interface at the [edit] hierarchy level.
Enable the transmission of packets with no or a single 802.1Q VLAN tag:
set interfaces ge-0/0/11 flexible-vlan-tagging
Enable extended VLAN bridge encapsulation:
set interfaces ge-0/0/11 encapsulation extended-vlan-bridge
Map packets from all C-VLANs to a logical interface:
set interfaces ge-0/0/11 unit 615 vlan-id-list 100-300
Enable a C-VLAN interface to send and receive untagged packets: (optional)
set interfaces ge-0/0/11 native-vlan-id 150
When specifying a native VLAN ID on a C-VLAN physical interface, the value must be included in the VLAN ID list specified on the C-VLAN logical interface in the step above.
Specify that packets traveling from a C-VLAN interface to an S-VLAN interface are tagged with the VLAN ID of the S-VLAN:
set interfaces ge-0/0/11 unit 615 input-vlan-map push
Specify that the 802.1Q S-VLAN tag is removed as packets exit an S-VLAN interface:
set interfaces ge-0/0/11 unit 615 output-vlan-map pop
Configure a name for the S-VLAN, and associate the logical interface configured in step 3 with the S-VLAN:
set vlans v615 interface ge-0/0/11.615
Configure the all-in-one bundling method on an S-VLAN interface at the [edit] hierarchy level.
Enable the transmission of packets with no, one, or two 802.1Q VLAN tags:
set interfaces ge-0/1/0 flexible-vlan-tagging
Enable extended VLAN bridge encapsulation:
set interfaces ge-0/1/0 encapsulation extended-vlan-bridge
Map packets from the logical interface specified in the C-VLAN interface configuration to the S-VLAN:
set interfaces ge-0/1/0 unit 615 vlan-id 615
Enable the S-VLAN interface to send and receive untagged packets: (optional)
set interfaces ge-0/1/0 native-vlan-id 615
When specifying a native VLAN ID on an S-VLAN physical interface, the value must match the VLAN ID specified on the S-VLAN logical interface in the step above.
Associate the S-VLAN interface with the S-VLAN that was configured in the C-VLAN interface procedure:
set vlans v615 interface ge-0/1/0.615
NOTE:
- No need to associate VLAN-ID 615 under “set vlans 615 hierarchy” and C-VLANs.
- No need to create C-VLANs on the switch.
In case you need to pass additional VLANS on the same S-VLAN interface follow the steps below ;( i.e. VLAN 3010)
set interfaces ge-0/1/0 unit 3010 vlan-id 3010
set vlans vlan3010 vlan-id 3010
set vlans vlan3010 interface ge-0/1/0.3010
Finally, associate this VLAN interface with other necessary interfaces on the switch.