RECOVERING CISCO NEXUS 3000 SERIES SWITCH USING A TFTP SERVER
INTRODUCTION
Cisco Nexus 3000 Series Switches are designed for data center top-of-rack deployments by providing 24 to 128 ports offering flexible connectivity, high performance, and a comprehensive feature set. It usually runs on multiple versions of OS images including 6.2a, 6.3a, 6.8, 7.3 and many others.

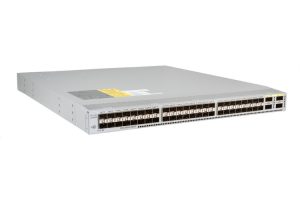
Figure 1: Nexus 3000 series switch
TFTP (Trivial FTP), is a file-transfer protocol geared towards a much simpler, and thus less robust, set of needs as far as file transfers go. TFTP is ideal for transferring of firmware updates, moving system images around, and other tasks that require far more functionality than the traditional FTP. It operates on UDP port 69.
In this article, we are going to recover a Cisco Nexus 3000 Series Switch using images installed on a TFTP server.
SIGNS OF A FAULTY NEXUS SWITCH
- Continuous booting,
- Cannot load Operating system image,
- Cannot read USB drives.
PREREQUISITES
- In this article, the TFTP server IP address is 168.10.10/24.
- Ensure the kickstart and main images are stored in the TFTP server and set the TFTP server to use the directory or folder where the files are located.
- In this article, we shall use n3000-uk9-kickstart.6.0.2.U5.3.bin as our kickstart image and n3000-uk9.6.0.2.U5.3.bin as our file image.
SETTING UP THE TFTP SERVER.
In this article, a Debian-based Linux server with UFW firewall was used to set up the TFTP server as root user.
NB: The configuration on the server IP address is beyond the scope of this article.
- Install the TFTP server.
# apt-get -y update && apt-get install -y tftp-hpa
- Configure the TFTP server.
# echo ‘TFTP_USERNAME=”tftp”‘ > /etc/default/tftpd-hpa
# echo ‘TFTP_DIRECTORY=”/srv/tftp”‘ >> /etc/default/tftpd-hpa
# echo ‘TFTP_ADDRESS=”0.0.0.0:69″‘ >> /etc/default/tftpd-hpa
# echo ‘TFTP_OPTIONS=”–secure”‘ >> /etc/default/tftpd-hpa
- Copy the Cisco recovery images (assuming they are in the current working directory) to the TFTP directory
# cp -n n3000-uk9-kickstart.6.0.2.U5.3.bin /srv/tftp
# cp -n n3000-uk9.6.0.2.U5.3.bin /srv/tftp
- Start the TFTP service
# systemctl start tftpd-hpa
- Allow traffic to the TFTP port.
# ufw allow to any port 69
RECOVERING THE NEXUS SWITCH
- Connect the switch’s Management (MGMT) port (by the power supply) to the network where the TFTP server resides.
- Configure the switch’s IP reachability using the management port to be able to communicate with the TFTP server.
loader> set ip 192.168.10.4 255.255.255.0
loader> set gw 192.168.10.1
- Boot the kickstart image file from the TFTP server.
loader>boot tftp://192.168.10.10/n3000-uk9-kickstart.6.0.2.U5.3.bin
- After a successful boot, you will be directed to the (boot)# From here, you can check whether the boot flash is empty. If empty, copy the files (kickstart image, main image, and license file) over from the TFTP server.
- NB. You may need to format the bootflash in case of corrupted condition.
- If all is well, then copy the kickstart and main image files using the following commands:
switch(boot)#copy tftp://192.168.10.10/n3000-uk9-kickstart.6.0.2.U5.3.bin bootflash:/n3000-uk9-kickstart.6.0.2.U5.3.bin
switch(boot)#copy tftp://192.168.10.10/n3000-uk9.6.0.2.U5.3.bin bootflash:/n3000-uk9.6.0.2.U5.3.bin
- Verify that both images are in the bootflash using the command:
switch(boot)#dir bootflash:
- See if the switch is able to boot up using the main image.
switch(boot)#load bootflash:/n3000-uk9.6.0.2.U5.3.bin
- During the boot, you will be asked whether you would like to enter the initial configuration mode, type This will lead you to the basic configuration, you can then verify your configuration present using the command “show running configuration” in configuration mode.
switch#show running-config
- Go ahead and reload the switch to ensure that the switch is able to boot up normally.
switch#reload
FURTHER READING