Uploading Cisco IOS using XMODEM
Problem Statement
There are times when a router/switch can only boot up in ROMmon. This happens when the router/switch has no valid Cisco IOS software or bootflash image to boot from. This disaster recovery situation arises when, for example, the Cisco IOS software on the router/switch is corrupted or has crashed.
There are also cases where the router/switch has no USB port, or where it is not possible to set up a network connection with the router/switch, and hence using the Trivial File Transfer Protocol (TFTP) is not a solution.
The only solution in these unfortunate situations is connecting the serial port of one’s PC directly to the router’s console port, and using the XMODEM file transfer protocol.
XMODEM is a simple file transfer protocol, and this solution relies on the speed of the switch’s console port and that of the PC’s serial port. This means that the file transfer process using XMODEM in the solution described below is a process that requires patience.
Solution
Step I: Connect an RS-232 serial cable to the PC’s serial port and the switch’s console port.
Step II: Start up the terminal emulator program on the PC (Tera Term for this illustration).
Step III: Power on the switch.
Step IV: In ROMmon, use the command “set BAUD <value>” to set the baud rate of the switch’s console port, as shown below. The higher the baud rate, the faster the transfer process. However, higher baud rates may not be supported by some ports.
switch: set BAUD 57600
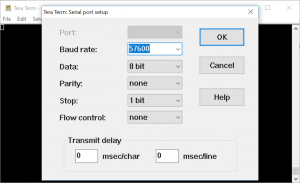
Step V: In the terminal emulator program navigate to the serial port settings.
Click “Setup”, and then click “Serial port…”
Step VI: Change the baud rate to match what has been set in step IV above.
Step VII: Back in ROMmon, enter the command below. This initiates the transfer process from the switch side.
switch: copy xmodem: flash:c3550-ipservicesk9-mz.122-44.SE6.bin
Once you press “enter” the output below will be displayed.
Begin the Xmodem or Xmodem-1K transfer now…
C………………………………………………………………………………..
Step VIII: Upon pressing enter after the command in step VII above, in the terminal emulator program, navigate to the file location on the PC and initiate the sending process.
Click “File”, then “Transfer”, then “Xmodem”,
then “Send”, then choose the IOS image for transfer.
Once the transfer starts, a window similar to the one below will pop up.
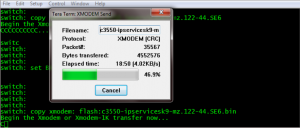
Step IX: Once the transfer process is complete, you will be back to ROMmon prompt.
Begin the Xmodem or Xmodem-1K transfer now…
C……………………………………………………………………
File “xmodem:” successfully copied to “flash:c3550-ipservicesk9-mz.122-44.SE6.bin”
Step X: After the transfer, please remember to change the baud rate back to the default value of 9600 on the switch (using the command “set BAUD <value>”) and on the terminal emulator program using the procedure in steps V and VI.
Step XI: In ROMmon, the switch can now be booted from flash with the command below.
switch: boot flash:c3550-ipservicesk9-mz.122-44.SE6.bin
Step XII: If the transfer process went well, then the boot up process will also proceed smoothly.
Loading “flash:c3550-ipservicesk9-mz.122-44.SE6.bin”…
Step XIII: You should now be home and dry 😊.